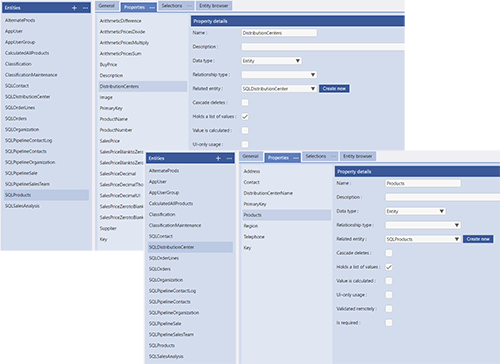
You will then need to map your Evoke Entity structures, used in the user interface of your app design, to their respective database fields/columns using the Evoke Data Mappings.
There are multiple options in Evoke that will help you to Create and Manage your SQL Tables while you are working on your App design.
As you will have seen in these Evoke areas, connecting to your database and setting up the Evoke Entities Local Data against your columns in your tables is very straight forward. The following section goes on to describe the use of Related Data (properties holding a key or link to a record or multiple records in another table/file). SQL databases use Joins (one to one/one to many) and Link Tables (many to many) to identify relationships in your tables and your Evoke App Design.
When using a SQL Database a typical example of using a Join (one to one/one to many) would be a relationship between a record in a "Customer" Table and an order or multiple order records in an "Order" Table. There is an example of this exact data structure in the Example App Design that is included in all Evoke accounts.
Select Direct Join from the "Key Storage Type" dropdown list and the following new parameters will be displayed for you to fill in.
-
Local Source Column - the Column name, in the Repository (database) that holds the local foreign-key/value to be matched with value(s) in the Remote Match Column (see below). If the Local Source Column does not exist use the "create" button (see image right to create the Column in the Repository (database) Table.
-
Local Source Column Type - the data type (picked from the drop down list) of the Local Source Column (see above) in the repository (database).
-
Remote Table Name - the Table name, in the Repository (database), that holds the related data.
- Remote Match Column - the Column name, in the Repository (database) table, identified in the "Remote Table Name" above, that holds the local foreign-key/value to be matched with the Local Source Column.
-
Remote Match Column Type - the data type (picked from the drop down list) of the Remote Match Column (see above) in the repository (database).
-
Remote Match Column is not Key - Checkbox, indicates if the Remote Match Column is the primary key (not checked) or is NOT the Primary key (checked) in the Remote Table (as defined above).
-
Sort Clause - Select, from the dropdown list, a Column name to sort the data selected (returned).
Link Tables
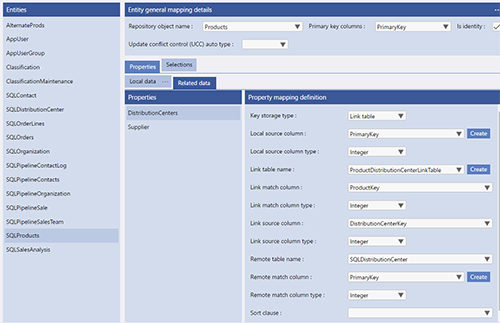
When using a SQL Database a typical example of using a Link would be a relationship between a record in a "Product" Table and the distribution centers in a "Distribution Center" Table. Each distibution center could hold multiple products and each product could be stored at multiple distribution centers. There is an example of this exact data structure in the Example App Design that is included in all Evoke accounts.
Select Link Table from the "Key Storage Type" dropdown list and the following new parameters will be displayed for you to fill in.
-
Local Source Column - the Column name, in the Repository (database) that holds the local foreign-key/value to be matched with value(s) in the Link Match Column (see below). If the Local Source Column does not exist in your Source Table (PRODUCTS) use the "create" button (see image right to create the Column in the Repository (database) Table.
-
Local Source Column Type - the data type (picked from the drop down list) of the Local Source Column (see above) in the repository (database).
-
Link Table Name - the Table name, in the Repository (database), that holds the Link Table.
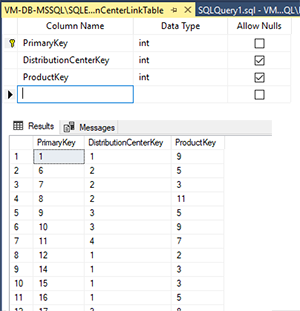
An example of a typical LINK TABLE structure (design and sample contents) appears in the image on the right.
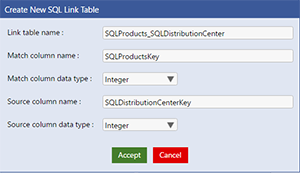
If the LINK TABLE does not exist in your database you can use the "create" button (see image left to create the Repository (database) Table. -
Link Match Column - the Column name, in the LINK TABLE, identified in the "LINK Table Name" above, that holds the local foreign-key/value to be matched with the Local Source Column.
-
Link Match Column Type - the data type (picked from the drop down list) of the LINK TABLE Link Match Column (see above) in the repository (database).
-
Link Source Column - the Column name, in the LINK TABLE that holds the local foreign-key/value to be matched with the Remote Match Column (see below).
-
Link Source Column Type - the data type (picked from the drop down list) of the LINK TABLE Link Source Column (see above) in the repository (database).
-
Remote Table Name - the Table name, in the Repository (database), that holds the related data.
- Remote Match Column - the Column name, in the Repository (database) table, identified in the "Remote Table Name" above, that holds the local foreign-key/value to be matched with the LINK TABLE Link Source Column.
-
Remote Match Column Type - the data type (picked from the drop down list) of the Remote Match Column (see above) in the repository (database).
-
Sort Clause - Select, from the dropdown list, a Column name to sort the data selected (returned).
When you populate a DataSource with a Selection (button, click action, page action, etc) then any Related Data, that you wish to access/use needs to be populated (read from the database) seperately. Please refer to the Retrieve Related Data section of Populating a DataSource to see how to use the RetrieveRelatedData click actions or 'Entity Properties to Load' options on buttons and widgets.
Using Joined or Link Tabled Data in the App Design UI
If you have followed the information above, you have created your 1 to 1, 1 to Many or Many to Many Joined or Link Tabled Properties in Entities and Mapped your data to your Database as Related Data. Now you need to use the data in the User Interface of your App Design.
The example screen on the right is once again from the Example app design included in all Evoke accounts. It shows the display of the SQLORGANIZATION Table and "Joined" SQLORDERS that were used in the example above.
A Selection was run (on the "Printing" Page) when the user enters the first few letters of the Customers name. This populated SQLORGANIZATIONS into the DataSource called Customers which in turn displays the customers in a datagrid.
When a specific line on the datagrid (a Customer) is clicked on/selected the Related Data, in this case the "Joined" Orders, were retrieved via use of the RetrieveRelatedData ClickAction.
LINK TABLE Related Data is retrieved in exactly the same way and, in this example, adding "OrdersCompleted.OrderLines.Product" to the RetrieveRelatedData Click Action will retrieve the associated/related Product records allowing the product name to be displayed.
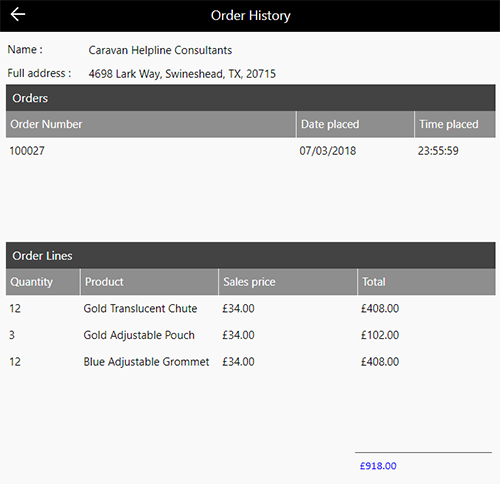
Then the page shown on the right is navigated to via the header menu in the "Customer Details" segment
The top two Data Grids shown in the image have the following DataSources (identified and filled in by using the DataSource Build button) "Customers.current" and "Customers.current.OrdersCompleted" - which means that the information shown in the second grid will be the JOINED data associated with the "Customer" record selected in the grid above.
Using Existing and new Custom Middle Tier C# in your app
-
Provide custom C# that will be called at a particular points in the overall (generated code) database access process
-
Provide custom C# that will completely override the generated code database access process
Both approaches allow you to enter code into the custom code file initially created by the Evoke code generator. Each entity type has its own custom code file, located in the RepositoryAccess project within folder Repositories\SQL\databasetype.
The C# database access code generated by Evoke contains numerous places (called 'custom code hooks') where a call into the custom code file is performed. This allows you to augment the standard database access process as required.
Each custom code hook is associated with a specific CRUD (Create, Read, Update, Delete) action and will be called numerous times through the CRUD action; the InvokePosition argument identifies the particular place. Custom code hooks also provide context specific data as well as the internal database command object for you to use as necessary.
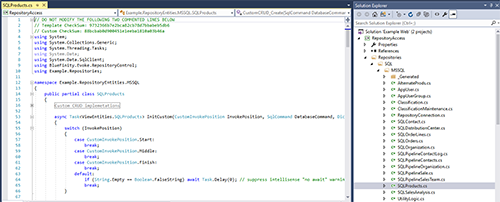
Click on the image on the right to review a larger image showing the Custom Code Hooks in the Visual Studio Solution/Repositories Project for the Example App. The file that is open is the Repositories\SQL\MSSQL\SQLProducts C# file and the Custom Code Hooks are shown in the code.
Overriding the standard database access process
If you wish to implement your own database access process for all or some of the CRUD actions of an entity type, there are a series of custom code hooks at the top of the custom code file (within the 'Custom CRUD implementations' region) which allow you to do so.
Click on the image on the right to review a larger image showing the Generated CRUD actions, that can have custom code added to them, in the Visual Studio Solution/Repositories Project for the Example App. The file that is open is the Repositories\SQL\MSSQL\SQLProducts C# file and the CRUD Custom Code Hooks are shown in the code.


